


"How to Print on Fabric"
Supplies:
*Freezer Paper
*Scissors
*Muslin
*Iron
*Sheet of printer paper (or ruler)
Step 1: Gather your Supplies
Step 2: Take your muslin, lay it out flat and trace around your printer paper onto it. Now cut out your fabric. It should be the same size as your printer paper, or slightly smaller. Larger will not work, so make sure it is just slightly smaller than your piece of paper. Now, you will also trace your printer paper again, but onto your freezer paper, making it the same size as your printer paper. Cut out both your fabric and freezer paper.
Step 3: You are now going to "fool" your printer into thinking it is printing onto paper! What you need to do is take your iron, set it on hot with NO steam. Take your freezer paper and with SHINY side up, place your fabric onto it. They should be an almost perfect fit. Now iron your muslin onto the freezer paper. They will adhere to one another. That is the reason for the shiny side being up, as this side sticks to your fabric. I just work the hot iron around the fabric checking the edges to see if it is stuck together. This doesn't take long.
Step 4: Once your fabric and paper are one. You are now going to feed this into your printer as you would any piece of printer paper. Just remember as to which side your printer prints onto, as you see mine goes in upside down.
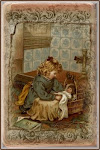
Step 5: Now the fun begins, printing onto your fabric! Choose whatever now it is that you want to print onto your fabric. You can print out vintage images, sayings, quotes, doodles...the sky is the limit! And all you need to do is hit....PRINT! Your printer will feed your fabric thru just as if it were printing onto paper!
Step 6: Pull your fabric from the freezer paper. Now you can cut or tear away your images, stitch your doodles, or make them into small pillows, etc. The sky is the limit!!!!


.jpg)


.jpg)


.JPG)


No comments:
Post a Comment